Introduction
This guide will walk you through setting up an ADS-B receiver using a Raspberry Pi Zero and an RTL-SDR dongle to track aircraft in real time. We will use dump1090 to decode ADS-B signals and optionally feed data to services like FlightAware, ADS-B Exchange, and OpenSky Network.
Hardware Requirements
Required Components:
- Raspberry Pi Zero 2 (W recommended for Wi-Fi support)
Price: $24 USD | Buy this on Amazon - MicroSD card (16GB or larger, Class 10 recommended)
Price: $7 USD | Buy this on Amazon - RTL-SDR USB dongle (RTL2832U-based)
Price: $35 USD | Buy this on Amazon - Optional: Micro-USB OTG adapter (to connect the RTL-SDR to the Pi Zero)
Price: $8 USD | Buy this on Amazon - Optional: Power supply (5V/2A recommended)
Price: $10 USD | Buy this on Amazon - Optional: External ADS-B antenna for better reception
Price: $42 USD | Buy this on Amazon
Step 1: Install Raspberry Pi OS
- Download Raspberry Pi OS Lite from the official website.
- Use Raspberry Pi Imager or balenaEtcher to flash the image onto the microSD card.
- Enable SSH for headless setup:
- After flashing, create an empty file named
sshin the boot partition. - If using Wi-Fi, create a
wpa_supplicant.conffile with:
country=US ctrl_interface=DIR=/var/run/wpa_supplicant GROUP=netdev update_config=1 network={ ssid="YourSSID" psk="YourPassword" } - After flashing, create an empty file named
- Insert the microSD card into the Pi and power it on.
Step 2: Connect to the Pi via SSH
Find the Pi’s IP address using arp -a (on Windows) or sudo nmap -sn 192.168.1.0/24 (Linux/macOS). Then, connect via SSH:
ssh pi@<your_pi_ip>Default password: raspberry (Change it with passwd)
Step 3: Update the System
sudo apt update && sudo apt upgrade -yInstall required dependencies:
sudo apt install git build-essential librtlsdr-dev -yStep 4: Install dump1090-mutability
You have two options to install dump1090-mutability:
Option A: Install via apt-get
sudo apt install dump1090-mutability -yAfter installation, start dump1090-mutability:
sudo systemctl start dump1090-mutability
sudo systemctl enable dump1090-mutability
Option B: Build from Source
cd ~
git clone https://github.com/mutability/dump1090.git
cd dump1090
make
sudo make install
Start dump1090:
sudo dump1090 --interactive --netIf successful, you should see live aircraft data!
Step 5: Autostart dump1090 on Boot (if built from source)
If you built dump1090 from source, create a systemd service:
sudo nano /etc/systemd/system/dump1090.servicePaste the following:
[Unit]
Description=dump1090 ADS-B decoder
After=network.target

[Service]
ExecStart=/usr/local/bin/dump1090 --interactive --net --net-http-port 8080
Restart=always
User=root

[Install]
WantedBy=default.target
Save and exit, then enable it:
sudo systemctl enable dump1090
sudo systemctl start dump1090
Step 6: View ADS-B Data in a Web Browser
Visit http://<your_pi_ip>:8080 to see aircraft data on a live map.
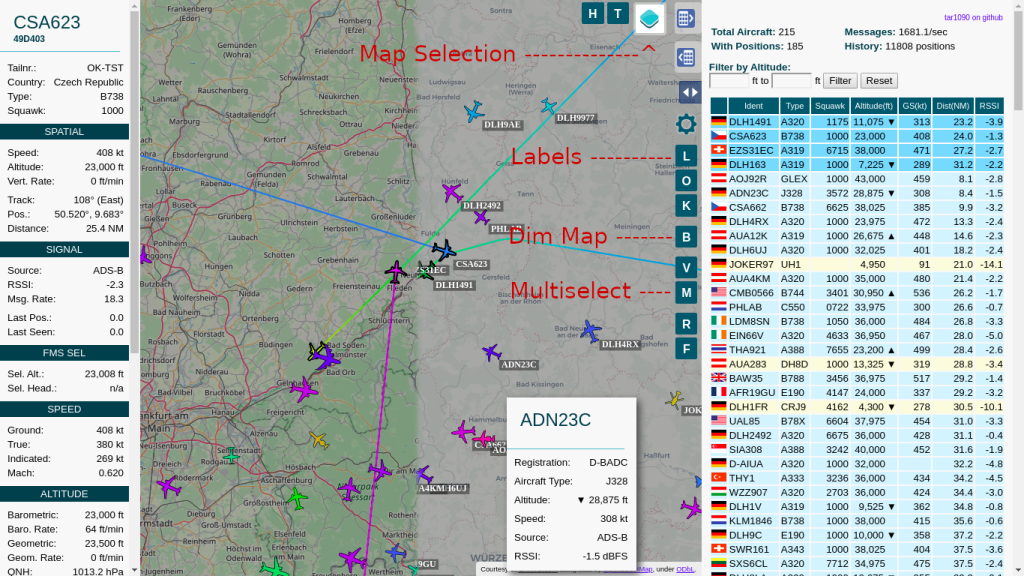
Step 7: Install tar1090 for Enhanced Visualization (Optional)
tar1090 provides an improved web interface for dump1090. To install:
sudo bash -c "$(wget -O - https://raw.githubusercontent.com/wiedehopf/tar1090/master/install.sh)"After installation, access the interface at http://<your_pi_ip>/tar1090.
Step 8: Feed Data to ADS-B Networks (Optional)
FlightAware:
sudo bash -c "$(wget -O - https://flightaware.com/adsb/piaware/install)"Create an account on FlightAware and claim your receiver.
ADS-B Exchange:
sudo bash -c "$(wget -O - http://adsbexchange.com/feed.sh)"Follow the setup steps to begin feeding.
OpenSky Network:
sudo apt install opensky-feeder
sudo nano /etc/opensky-feeder/config.yaml
Edit with your OpenSky username and password, then start the service:
sudo systemctl restart opensky-feederStep 8: Optimize Performance
Reduce CPU Load (especially for Pi Zero):
sudo nano /boot/config.txtAdd:
force_turbo=1
arm_freq=1000
Improve Reception:
- Use an external ADS-B antenna.
- Place it near a window or outside for better coverage.
Conclusion
Congratulations! You’ve successfully set up an ADS-B receiver on a Raspberry Pi Zero. You can now track aircraft in real time and optionally share data with major networks.
Next Steps:
- Experiment with different antennas.
- Integrate your feed with graphs1090 for performance monitoring.
- Explore additional ADS-B software like tar1090 for better visualization.
🚀 Happy tracking!

